
Repair a stone chip simply by first cleaning the spot, then carefully putting on several layers of touch-up paint that matches your car color, and finally covering it with a sealant once completely dry. If you carry out the touch-up paint operation within a couple of days after the chip has happened, you are effectively preventing water from getting to the steel that is exposed underneath, which is the biggest reason of rust. Most people will do the whole thing in less than one hour and it will be just a small part of what a professional panel repair would cost.
Actually the need for speed is that a stone chip is not only a surface damage. Once the paint and primer layer are broken, the metal itself is left open and is exposed to moisture, salt residues on the road and humidity. The metal will start to oxidize quite fast, and once the rust has formed underneath the paint and has spread, it advances even under the clearcoat where you cannot access it. So, then you are no longer repairing a chip, rather you are controlling rust.
Table of Contents
ToggleWhy Stone Chips Turn Into Rust So Quickly
Nowadays, a car’s bodywork consists of several layers: first a metal sheet, then a special type of painting called an electrocoat or primer, a coloured base coat, and finally a transparent paint called a clearcoat. A rock flung at a high-speed motorway level could have sufficient energy not only to make a crack in all these layers but sometimes the crack is so tiny that it looks like a pinhead. The tiniest opening is, in fact, all a corrosion needs.
Rust is steel’s reaction to iron combining with oxygen and water; if there is anything that helps the reaction, the process speeds up. That’s why road salt used in winter and air by the sea make paint damage much more harmful. Vehicle industry data on corrosion has always shown that road de-icing salt causes faster paint failure, and drivers in northern UK or those close to the coast give accounts of car paint chips breaking down much faster than people in the drier, inland areas. A paint chip that would not cause any damage over a whole year in summer might begin to show orange rust just a few weeks after salt is spread in November.
Another aspect is the part of the car itself. The front bumper, the leading edge of the bonnet, the lower parts of the doors, and the region behind the wheels are receiving the most damage since they come into contact with the bits of debris that your tyres as well as other traffic tyres throw up. Besides, these are the places where water should collect and stay, so they are prone to getting corroded.
How to Tell a Surface Chip From One That Needs Real Work
Press a fingernail gently against the tip of a chip. If it gets stuck at a clean edge where grey or silver is exposed at the bottom, the chip has gone down to primer or metal and it is imperative to seal it without delay. If the bottom of the chip is still coloured, then it is only the clearcoat that has been scratched and there is some more time for action although it is still advisable to do something.
The sign of danger, which one should not overlook, is any orange or brown colourations observed inside or around the chip. This is on-going rust, so a simple touch-up on top of it will merely encase the rust and allow its further spread underneath the paintwork. Chips showing rust are first stripped of the contaminated metal down to a clean surface by an abrasive of fine grade or a rust-conversion liquid, followed by painting.
Another factor influencing the type of treatment is the size. A chip up to approximately 2 or 3 mm in diameter can be pretty easily corrected at home by touch-up. Then again, once the size of a chip reaches that of a 5 pence coin, or a group of them spread across a panel, the choices become professional refinishing or smart repair, which are normally in the range of eighty to two hundred pounds based on the panel and your locality.
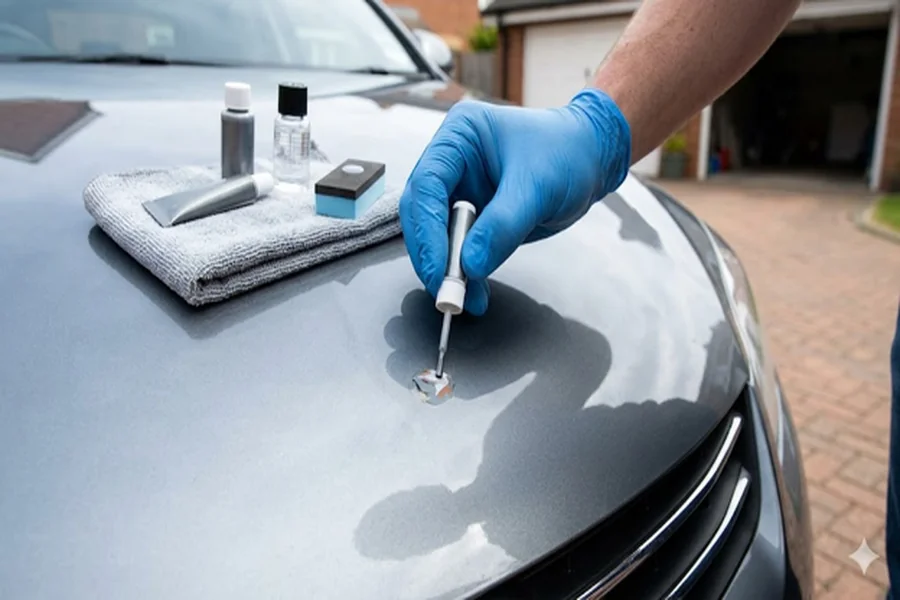
The Step-by-Step Process for a Lasting Repair
First of all, make sure to clean the surface thoroughly, since paint won’t stick at all on greasy or waxy surfaces. Get the area washed, dried, and then wipe it with a bit of isopropyl alcohol or a special panel wipe to remove any polish residue. Not doing this turns out to be the top reason why paint chips get peeled off or appear cloudy later on.
Rust, if any, should be tackled immediately. Carefully remove the rust with some abrasion, treat the spot with a rust converter if there is still some pitting, and clean it once more. When you have a neat chip, you can directly go for the colour. Use the car’s manufacturer paint code to get the paint right, which is generally printed on a label either on the driver’s door, under the bonnet, or in the service book. It is really important to get this code accurately as slight deviation in colour is very noticeable in the daylight to the naked eye.
Instead of applying a thick blob of paint, use thin coats to cover the area. Eventually, the chip should be elevated just a bit below that of the neighbouring paint. Thin layers cure properly, and do not shrink or crack which usually happens with hurry jobs. Deep chips may require 3-4 layers spread over the entire hour.
After the paint has dried and probably sitting a little bit proud of the surface, you would then sand it and blend it in. This is why a whole system is usually superior to just a single bottle of touch up paint – because it’s not just about matching the colour; it’s also about filling the chip and then blending the edges back to the original paint which is what actually makes the repair vanishing rather than just hiding. Suppliers like chipex offer kits specially designed around the blending step as it is the blunder that most DIYers make. To wrap up, seal the repair with clearcoat or wax only after everything has fully hardened. For the paint to reach full strength, it usually takes a couple of days.
What Results to Realistically Expect
If the chip repair is well-matched and blended properly, on a simple color like black, white, or silver, it can be nearly invisible even at a short distance. Metallic and pearl colors, Then again, are quite challenging as the flake and depth are almost impossible to replicate by hand, so expect a repair that is hardly noticeable rather than a flawless one. If you look really closely under bright light, you might still identify it.
Essentially what you are getting is safeguarding. In fact, even a not absolutely perfect touch-up will arrest the development of rust, keep the metal intact, and preserve the value of the car, because visible corrosion and bubbling paint definitely diminish the price of a car much more than a few nice touch-ups would. For a daily driver or a lease car that you want to return clean, the investment in this trade is more than justified.
Longevity is mainly influenced by how the preparation is done. A repair carried out on a properly cleaned surface that is free of rust and under mild dry conditions can be good for years. One done hurriedly in cold or damp weather and onto a greasy or rusty chip might even lift within a season. So, you should choose and dry day with a temperature of about fifteen degrees or higher and keep the car out of the rain for at least twenty-four hours after the repair.


